I love the close up, Nancy! As always, your painting looks so very original, like a sci-fi rendering of your subject. Like Angela I wonder how you manage this effect? Do you first sketch your subject with broad segments, do you just go for it? What? You're style is very creative and one of a kind. Superb.
Thanks for the comments, much appreciated, and I'm glad you like Muffy (my blog explains the story of the name of this).
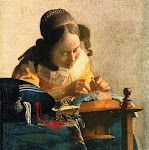
The method (to my madness) stems from an assignment I did back in high school art class. A live model was put in front of the room. Then using assorted color paper, and only our hands, we had to create her by tearing shapes of colors and glueing them down. They could overlap as needed, and we were free to make as many (or as few) shapes as we wanted. It taught us not to fuss with details and focus on shapes. It also taught us color against color along with shades (values) of colors.
Now, years later (too many to count), I took up painting again after a hiatus. I found that painting realism is stressful for me, and that there are far better realistic artists in the world than what I could produce. I remembered back to that one class assignment - so I started to take photos & "play" with them in Photoshop on the computer. I found I could mimic that torn paper look. I started doing more images that way and studying the effects.
I usually use a grid on my canvas (was taught that method long,long ago by my dad), and then I'll sketch in the "shapes" that I see. Before I sketch anything, though, I decide on the colors I will be using, and how many shades or values I will have. This puppy has only 4 colors used: black, white, blue and terra cotta. There are 5 shades used: black, med gray, light gray, blue gray and the terra cotta gray. By limiting the colors & shades, I had to make the shapes larger. Subtle color shifts were combined in some areas.
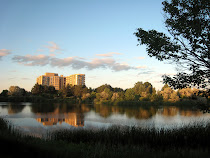
If the subject I'm doing is not too complicated, I can usually eyeball the shapes & colors. But for more complicated subjects (like some of the NY city scenes I'm working on) I will play with them in Photoshop first, then print out a modified version of the image. I'll sketch in the lines where I see major color changes, but then add (or subtract) as I paint.
I don't know if this is helpful as it's all still a work in progress. I sort of make up the process as I go - LOL! I like the effect so I know I will be doing more of it.
Thanks for your tutorial, Nancy! Your technique is very creative and results in terrific paintings! Who knew such a simple exercise done years ago would shape your art all this time later? It's wonderful!
wonderful - you've captured the beautiful rich colors of the original & improved on them! & thank you for going over your process - it's always good to learn how others work!
Hi! We are a group of artists who are passionate about art and also love to help each other through critiques and helpful comments.
"Paint and Draw Together" really gives us a chance to learn from each other and advance in painting and drawing. I look forward to joining together with you in this creative journey through the art world.


10 comments:
How on earth do you do this? I love it. this is truly an original artistic statement. Most of all I love the hints of blue on the little nose.
Nancie, this has a very mysterious feel; Muffy's eyes are peering from the dark abyss! Very original indeed.
I love the close up, Nancy! As always, your painting looks so very original, like a sci-fi rendering of your subject. Like Angela I wonder how you manage this effect? Do you first sketch your subject with broad segments, do you just go for it? What? You're style is very creative and one of a kind. Superb.
Thanks for the comments, much appreciated, and I'm glad you like Muffy (my blog explains the story of the name of this).
The method (to my madness) stems from an assignment I did back in high school art class. A live model was put in front of the room. Then using assorted color paper, and only our hands, we had to create her by tearing shapes of colors and glueing them down. They could overlap as needed, and we were free to make as many (or as few) shapes as we wanted. It taught us not to fuss with details and focus on shapes. It also taught us color against color along with shades (values) of colors.
Now, years later (too many to count), I took up painting again after a hiatus. I found that painting realism is stressful for me, and that there are far better realistic artists in the world than what I could produce. I remembered back to that one class assignment - so I started to take photos & "play" with them in Photoshop on the computer. I found I could mimic that torn paper look. I started doing more images that way and studying the effects.
I usually use a grid on my canvas (was taught that method long,long ago by my dad), and then I'll sketch in the "shapes" that I see. Before I sketch anything, though, I decide on the colors I will be using, and how many shades or values I will have. This puppy has only 4 colors used: black, white, blue and terra cotta. There are 5 shades used: black, med gray, light gray, blue gray and the terra cotta gray. By limiting the colors & shades, I had to make the shapes larger. Subtle color shifts were combined in some areas.
If the subject I'm doing is not too complicated, I can usually eyeball the shapes & colors. But for more complicated subjects (like some of the NY city scenes I'm working on) I will play with them in Photoshop first, then print out a modified version of the image. I'll sketch in the lines where I see major color changes, but then add (or subtract) as I paint.
I don't know if this is helpful as it's all still a work in progress. I sort of make up the process as I go - LOL! I like the effect so I know I will be doing more of it.
Nancie just loved your work.The details you added yet keeping it simple.I simply loved the two little glowing eyes.So intense! Beautifully done!!
Thanks for your tutorial, Nancy! Your technique is very creative and results in terrific paintings! Who knew such a simple exercise done years ago would shape your art all this time later? It's wonderful!
Very neat - the close crop really adds an edge to this puppy!
Beautiful rendition, Nancy. I love the style, technique and the uniqueness of it.
wonderful - you've captured the beautiful rich colors of the original & improved on them! & thank you for going over your process - it's always good to learn how others work!
Wonderful, you really got the essence of the little guy. His eyes look so warm and inquiring! And a fascinating effect on the fur, love it.
Post a Comment